
The insulin pen is a device that holds an insulin cartridge and allows you to inject medicine into your body. The insulin pen is a great way to take your insulin with you wherever you go. It’s small, convenient, and easy to use.
Parts of an insulin pen
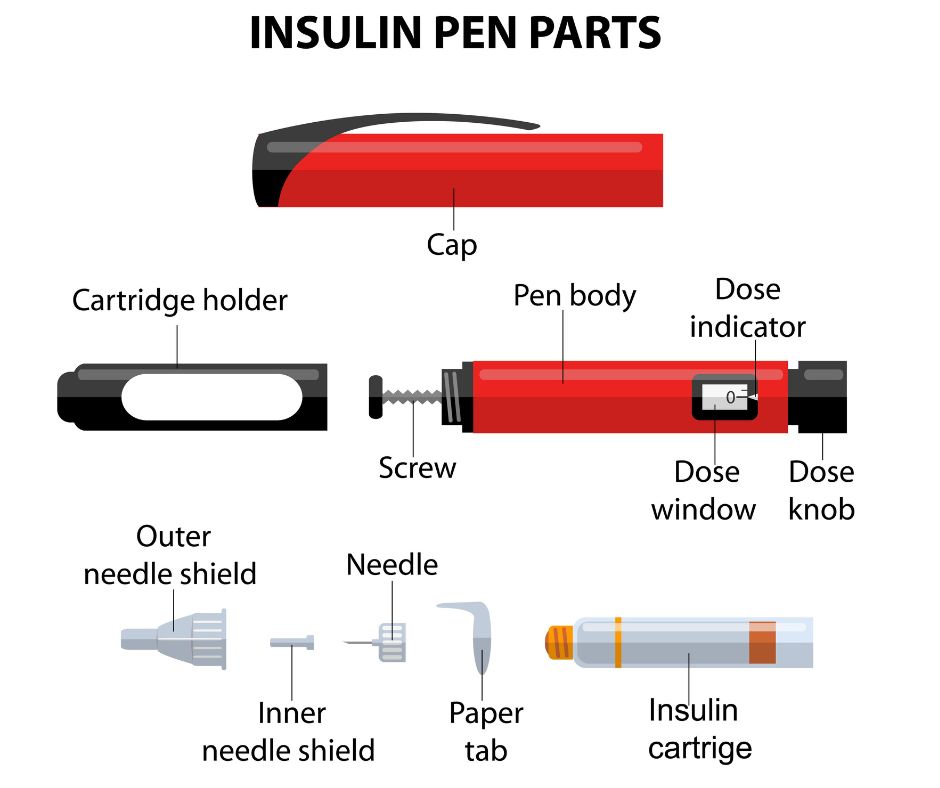
The pen has several parts, as shown:
- Needle : The needle is an essential part of the pen. It’s a thin tube made of steel or glass that has a point on one end. The needle can be used to put insulin into the body by attaching it to the reservoir and injecting it, or by inserting it through your skin at different points on your body so that insulin enters through those areas as well.
- Needle cover/shield : The pen’s needle cover protects against unintended injections of insulin.
- Pen cap : The pen cap covers the needle and keeps it safe. It also helps keep the insulin cool, which makes it easier to inject. The pen cap will also prevent any leakage from occurring in your pocket or purse.
- Insulin cartridge : An insulin cartridge is a small plastic container which holds the liquid form of your medication. It is inserted into the pen device and allows for precise dosing. Insulin cartridges come in various sizes, but you will likely be using either an U-100 or U-200 cartridge. In general, most people with diabetes will use either a 100/mL or 200/mL cartridge because this provides enough insulin for several days worth of coverage.
- Dose indicator : The dose selector is a button that lets you select the amount of insulin you want to inject. The dose indicator is usually marked with numbers which correspond to the number of units of insulin to inject.
- Dose knob : The button is where you press to release the insulin. This is a very important part of the pen, because it’s what allows you to use it!
How to use an insulin pen
Step 1. Preparing your insulin injection supplies
- Alcohol swabs for skin cleansing
- Insulin pen
- Pen needle (sizes may vary based on the amount of fat below your skin)
- Cartridge if the pen is the refillable type (e.g. Novolog Echo Pen, Humalog Junior Kwikpen)
- Sharps container. If this is unavailable, you can use an improvised empty laundry detergent container as a sharps container. Remember to label it as containing sharp objects before discarding it.
Step 2. Insulin pen preparation steps
The instructions may vary slightly based on the type of pen. These are general steps for most pens.
- Wash your hands with soap and water for at least 30 seconds. Alternatively, you may use an alcohol-based solution for skin cleansing
- Remove the cap of the pen (see the insulin pen parts diagram)
- Some insulins may need to be mixed, this can be achieved by gently rolling the pen in the palm of your hands. Alternatively, the pen can be turned back and forth, up to 10-15 times.
- Next, clean the pen tip with an alcohol wipe.
- Attach the pen needle to the pen. In most pens, you will need to gently screw it on. Do not take off the needle cover prior to screwing it onto the pen, to prevent inadvertent needle stick injuries.
- Remove the outer needle shield followed by the inner needle shield
Step 3. Priming of the pen and setting the dose
A process of priming ensures the mechanism of insulin administration is working correctly
- It is generally recommended to dial at least 2 units of insulin
- Point the needle-end of the pen upwards. Then gently, tap the insulin-containing reservoir (refillable or disposable cartridge). This allows the repositioning of air bubbles
- Then push down firmly and continuously on the dose knob. This will squirt a bit of insulin into the air, confirming that the dosing mechanism is working normally.
- Turn the dose knob while checking the dose window to the desired number of units of insulin recommended by your healthcare provider
Step 4. Insulin injection technique
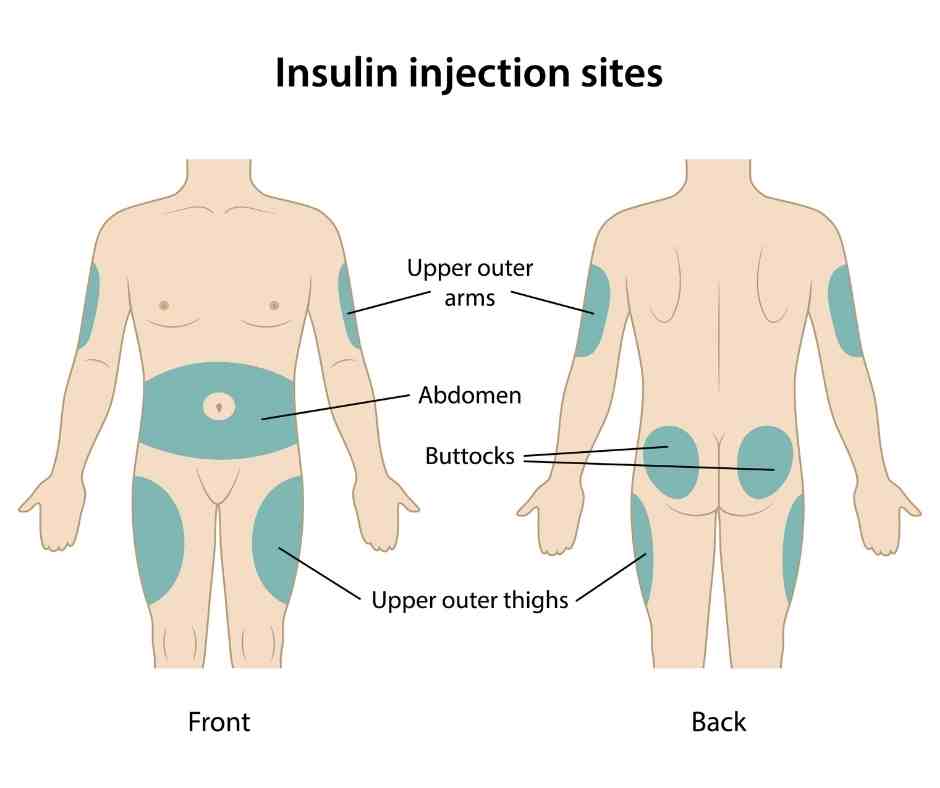
- Choose your preferred injection site. See the diagram below showing areas of ample subcutaneous (below skin) fat. The belly (at least two inches away from the belly button), back of the upper arms, upper outer thighs, and upper buttocks.
- Cleanse the injection site with an alcohol swab and allow it to dry.
- Next, pinch the skin between your thumb and index finger, depending of the amount of fat in the area. This helps to prevent inadvertent administration of the medication into muscle.
- You will then place the pen perpendicularly to the skin and then introduce the needle into the pinched up skin.
- Press the dose knob to deliver the amount of insulin needed. It is generally recommended that you count to up to ten seconds (especially for higher doses of insulin) before withdrawing the needle. Remember that even if the indicator reverts to zero, it may take up to 6 seconds for all of the medicine to be delivered. If you see insulin dripping continuously at the end of your needle, then you withdrew it too quickly from the skin.
- You should then release skin from the pinch and gently withdraw the needle.
Step 5. Safety precautions after the injection
- Recap the needle with the outer needle shield only (see the diagram of insulin pen parts)
- Turn the shield in the opposite direction (counterclockwise) to unscrew if from the pen.
- Then safely dispose the capped needle into your sharps container.
Types of insulin pens
- Long acting insulin
| Type of Long acting insulin | Pens per pack | Units per pen | mL per pen | Days until expiration at room temperature |
|---|---|---|---|---|
| Lantus Solostar | 5 pens | 300 units | 3mL | 30 days |
| Levemir Flextouch | 5 pens | 300 units | 3mL | 42 days |
| Toujeo Solostar – 1u increments (Up to 80 units) | 3 or 5 pens / pack | 450 units | 1.5mL | 42 days |
| Tresiba Flextouch | 5 pens for U100 | 300 units | 3mL | 56 days |
| Tresiba Flextouch (U200 pen in 2u increments up to 160units) | 3 pens for U200 | 600 units | 3mL | 56 days |
| Basaglar | 5 pens | 300 units | 3mL | 28 days |
- Meal time insulin
| Meal time insulin | Pens per pack | units per pen | ml per pen | days until expiration at room temperature |
|---|---|---|---|---|
| Apidra Solostar | 5 pens | 300 units | 3mL | 28 days |
| Humalog U100 Kwikpen | 5 pens | 300 units | 3mL | 28 days |
| Humalog U200 Kwikpen | 2 pens | 600 units | 3mL | 28 days |
| Novolog Flexpen | 5 pens | 300 units | 3mL | 28 days |
| Humulin R U500 Kwikpen (5u increments up to 300units) | 2 or 5 pens / pack | 1,500 units | 3mL | 28 days |
| FIASP Flextouch | 5 pens | 300 units | 3 mL | 28 days |
- Mixed insulin
| Mixed insulin | Pens per pack | units per pen | ml per pen | days until expiration at room temperature |
|---|---|---|---|---|
| Humalog 75/25 or 50/50 Kwikpen | 5 pens | 300 units | 3mL | 10 days |
| Humulin 70/30 Kwikpen | 5 pens | 300 units | 3mL | 10 days |
| Humulin NPH Kwikpen | 5 pens | 300 units | 3mL | 14 days |
| Novolog 70/30 | 5 pens | 300 units | 3mL | 14 days |
- Combination GLP-1 and basal insulin
| Combination GLP-1 and basal | Pens per pack | units per pen | ml per pen | days until expiration at room temperature |
|---|---|---|---|---|
| Soliqua 100/33 (Lantus/Lixisenatide) Each unit has 1u Lantus & 0.33mcg Lixisenatide | 5 pens | 300 units Lantus 99mcg Lixisenatide | 3mL | 14 days |
| Xultophy 100/3.6 (insulin degludec and liraglutide) | 5 pens | 300 units insulin degludec and 10.8mg liraglutide | 3mL | 21 days |
Rules for storage of insulin pens
- Opened pre-filled insulin cartridges of aspart (novolog), lispro (humalog), glulisine and regular insulin are best stored at room temperature for up to 28 days.
- Do not place pens that you have started using back into the refrigerator.
- For pre-mixed insulins and intermediate acting insulin (NPH) containing cartridges, they can be stored at room temperature for up to 14 days
The opinions expressed here represent the views of a practicing hormone specialist (endocrinologist) and must not substitute the advice of your health care provider. This blog post is written for a non-medical audience interested in learning more about hormonal disorders. The author has no commercial conflicts of interest to declare. Also, read our privacy policy.